
Custom API in Magento 2 offers a powerful way to extend the platform’s functionality and integrate with external systems. While Magento 2 provides default APIs, creating custom APIs becomes essential for specific business needs. In this article, we will guide you through the process of creating a custom API in Magento 2, along with a practical example. With this knowledge, you can seamlessly integrate your e-commerce store with third-party systems and implement tailored functionalities to enhance your business capabilities. Let’s dive into the world of Custom API development in Magento 2.
Table of Contents
Understanding Custom API in Magento 2
Custom APIs allow you to extend Magento’s functionality by defining your own endpoints to access and manipulate data. This is useful when you want to integrate with third-party systems, sync data, or create custom functionality that is not available through default APIs.
Steps to Create Custom API in Magento 2
Define the API Endpoints
Identify the data or functionality you want to expose through the API. Decide on the endpoints, methods (GET, POST, PUT, DELETE), and data structure (JSON, XML) for your API.
Create the API Interface
Create a new PHP interface that defines the API methods, parameters, and return types. This interface acts as a contract that your API implementation must adhere to.
Implement the API
Develop the API implementation class that implements the interface created in above step. Add the necessary logic to fetch or manipulate data based on the defined endpoints and methods.
Configure the API in Magento
Register your custom API in Magento’s webapi.xml file. Define the API route, the corresponding PHP class, and the authentication requirements (e.g., token-based authentication). To get an api authentication token you can follow this article Create access token in Magento 2
Step 5: Test the API:
Use tools like Postman or CURL to test your custom API endpoints and verify that they return the expected data or perform the intended actions.
Example of Custom Product API
For this example, let’s create a custom API to retrieve product details based on a custom attribute called “product_code.”
Define the API Endpoint
Endpoint: /V1/custom-products/:productCode
<?php
namespace YourNamespace\YourModule\Api;

interface CustomProductInterface
{
    /**
     * Get product details by product code
     *
     * @param string $productCode
     * @return \Magento\Catalog\Api\Data\ProductInterface
     * @throws \Magento\Framework\Exception\NoSuchEntityException
     */    public function getProductByCode($productCode);
}
Implement the API
<?php
namespace YourNamespace\YourModule\Model;

use YourNamespace\YourModule\Api\CustomProductInterface;
use Magento\Catalog\Api\ProductRepositoryInterface;

class CustomProduct implements CustomProductInterface
{
    protected $productRepository;

    public function __construct(
        ProductRepositoryInterface $productRepository
    ) {
        $this->productRepository = $productRepository;
    }

    /**
     * Get product details by product code
     *
     * @param string $productCode
     * @return \Magento\Catalog\Api\Data\ProductInterface
     * @throws \Magento\Framework\Exception\NoSuchEntityException
     */    public function getProductByCode($productCode)
    {
        $product = $this->productRepository->get($productCode);
        return $product;
    }
}
Configure the API in Magento
Register the custom API in your module’s webapi.xml file
<?xml version="1.0"?>
<routes xmlns:xsi="http://www.w3.org/2001/XMLSchema-instance" xsi:noNamespaceSchemaLocation="urn:magento:module:Magento_Webapi:etc/webapi.xsd">
    <route url="/V1/custom-products/:productCode" method="GET">
        <service class="Learningmagento\Dynamicrow\Api\CustomProductInterface" method="getProductByCode"/>
        <resources>
            <resource ref="anonymous"/>
        </resources>
    </route>
</routes>- Route: This URL, https://{{MagentoBaseURL}}/V1/custom-products/:productCode, serves as the endpoint for calling our API.
- Service Class: The interface class of our API, where the primary method
getProductByCodeis invoked withproductCodeas the parameter. - Resources: This section specifies the entities permitted to access the API. It may include anonymous users (everyone), authenticated customers (self), or specific admin users with defined permissions, like YourNamespace_YourModule::custom, which can be configured in acl.xml.
Add di.xml file
<?xml version="1.0"?>
<config xmlns:xsi="http://www.w3.org/2001/XMLSchema-instance" xsi:noNamespaceSchemaLocation="urn:magento:framework:ObjectManager/etc/config.xsd">
    <preference for="Learningmagento\Dynamicrow\Api\CustomProductInterface" type="Learningmagento\Dynamicrow\Model\CustomProduct" />
</config>
Test the API
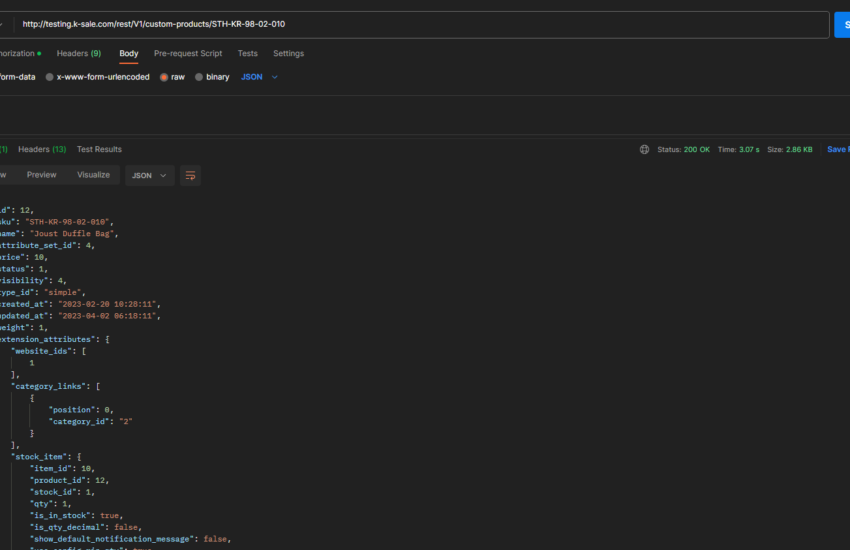
Using a tool like Postman, send a GET request to the custom API endpoint /V1/custom-products/:productCode with a valid product code as the parameter. The API should return the corresponding product details in the response.
Conclusion
Creating a custom API in Magento 2 empowers you to extend the platform’s capabilities, enabling seamless integration with external systems and tailored functionality for your business. By following the step-by-step guide and the practical example provided in this article, you can successfully create your own custom API and leverage the full potential of Magento 2 as a robust e-commerce solution. For more infromation you can check adobe commerce official documentation of Custom API
Very nice article. It not only explains but also given a google example