
Traditionally, in Magento 2, we utilized InstallData.php and UpgradeData.php to create product attributes. InstallData executed only during module installation, while UpgradeData was triggered on module version changes. With the advent of Magento 2.3, the introduction of db_schema and Data Patch brought a novel approach to applying data modifications. In this article, we explore the creation of a data patch file for generating product attributes.
Table of Contents
Data Patch in Magento 2
Magento introduced the Declarative Schema approach in Magento 2.3, which simplifies the process of managing database schema changes. As part of this approach, data patches have become a valuable tool.
Data patches in Magento 2 are PHP classes that contain instructions for modifying data within the database. They are used during the module upgrade process to make data changes or additions in a structured and versioned manner.
One practical application of it is adding attributes to products programmatically. This is particularly useful when customizing your e-commerce store, as it allows you to extend product attributes to meet your specific business needs. They ensure that these modifications are applied consistently and reliably across different versions of your module, helping you maintain data integrity and consistency.
Creating of product attribute using Data Patch
Create data patch class
<?php

/**
 *
 * @category  Custom Development
 * @email     contactus@learningmagento.com
 * @author    Learning Magento
 * @website   learningmagento.com
 * @Date      17-10-2023
 */
namespace Learningmagento\NewConcept\Setup\Patch\Data;

use Magento\Eav\Setup\EavSetupFactory;
use Magento\Framework\Setup\ModuleDataSetupInterface;
use Magento\Framework\Setup\Patch\DataPatchInterface;

class PrinterMake implements DataPatchInterface
{
    protected $_moduleDataSetup;

    protected $_eavSetupFactory;

    public function __construct(
        ModuleDataSetupInterface $moduleDataSetup,
        EavSetupFactory $eavSetupFactory
    ) {
        $this->_moduleDataSetup = $moduleDataSetup;
        $this->_eavSetupFactory = $eavSetupFactory;
    }

    /**
     * Get array of patches that have to be executed prior to this.
     *
     * Example of implementation:
     *
     * [
     *      \Vendor_Name\Module_Name\Setup\Patch\Patch1::class,
     *      \Vendor_Name\Module_Name\Setup\Patch\Patch2::class
     * ]
     *
     * @return string[]
     */    public static function getDependencies()
    {
        // TODO: Implement getDependencies() method.
        return [];
    }

    /**
     * Get aliases (previous names) for the patch.
     *
     * @return string[]
     */    public function getAliases()
    {
        // TODO: Implement getAliases() method.
        return [];
    }

    /**
     * Run code inside patch
     * If code fails, patch must be reverted, in case when we are speaking about schema - then under revert
     * means run PatchInterface::revert()
     *
     * If we speak about data, under revert means: $transaction->rollback()
     *
     * @return $this
     */    public function apply()
    {
        $eavSetup = $this->_eavSetupFactory->create(['setup' => $this->_moduleDataSetup]);

        $eavSetup->addAttribute(\Magento\Catalog\Model\Product::ENTITY, 'printer_make', [
            'type' => 'text',
            'backend' => '',
            'frontend' => '',
            'label' => 'Printer Make',
            'input' => 'select',
            'class' => 'printer_make_class',
            'source' => \Learningmagento\NewConcept\Model\Config\Source\MakeOptions::class,
            'global' => \Magento\Eav\Model\Entity\Attribute\ScopedAttributeInterface::SCOPE_GLOBAL,
            'visible' => true,
            'required' => false,
            'user_defined' => false,
            'default' => '',
            'searchable' => false,
            'filterable' => false,
            'comparable' => false,
            'visible_on_front' => false,
            'used_in_product_listing' => true,
            'unique' => false,
        ]);
    }
}
Create Make options class
<?php

/**
 *
 * @category  Custom Development
 * @email     contactus@learningmagento.com
 * @author    Learning Magento
 * @website   learningmagento.com
 * @Date      17-10-2023
 */
namespace Learningmagento\NewConcept\Model\Config\Source;

class MakeOptions extends \Magento\Eav\Model\Entity\Attribute\Source\AbstractSource
{

    protected $_options;

    /**
     * Retrieve All options
     *
     * @return array
     */    public function getAllOptions()
    {
        $this->_options = [
            ['label' => __('Hewlett-Packard'), 'value'=>'hp'],
            ['label' => __('Canon'), 'value'=>'canon'],
            ['label' => __('Apple'), 'value'=>'apple'],
            ['label' => __('Brother'), 'value'=>'brother'],
            ['label' => __('Dell'), 'value'=>'dell'],
            ['label' => __('Kodak'), 'value'=>'kodak'],
            ['label' => __('Epson'), 'value'=>'epson']
        ];
        return $this->_options;
    }
}
Run upgrade command
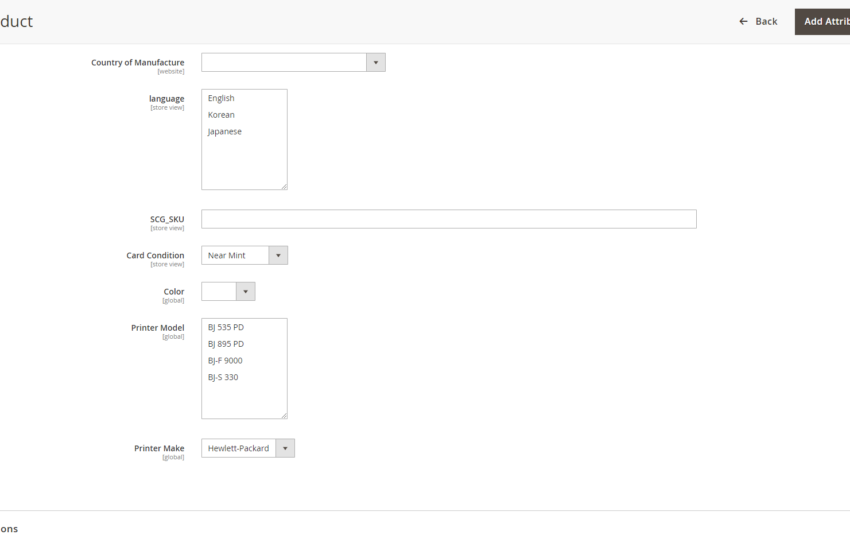
After adding both classes to your module, the final step is to execute the ‘setup:upgrade’ command. This process will generate entries in the eav_attribute table and other related tables. We presume that you’ve already created your module and are now adding a new attribute.

As you can see you cannot modify the attribute options as it was created by the code and not by an admin. To add or remove option you will need to modify the MakeOptions class by adding or removing options from there.

You can also see the attribute in the eav_attribute table where it will have the source model pointing to Learningmagento\NewConcept\Model\Config\Source\MakeOptions class.
Older way to do
While backward compatibility for attribute creation still exists, it’s important to note that this support may be phased out in the future. Hence, it’s advisable to adopt the new method for attribute creation in your development endeavours.
InstallData.php
InstallData.php plays a pivotal role in initializing and configuring a module’s database during installation. It is instrumental for developers in defining and executing data installation operations, including the creation of tables, addition of default records, and configuration of settings. This file is primarily used to establish the initial data structure and populate tables as necessary for the module’s functionality. By focusing on InstallData.php, developers ensure proper database schema management during module installation.
UpgradeData.php
UpgradeData.php is a vital component for managing and executing data upgrades when a module’s version is changed or updated. It allows developers to define and implement data migration operations, such as altering table structures, adding new fields, or modifying existing records. UpgradeData.php is crucial for ensuring that the database schema remains synchronized with the module’s evolving requirements. By using UpgradeData.php, developers can make sure that data updates are applied consistently and accurately, preserving the integrity of the database while accommodating changes in the module’s functionality.
Conclusion
As of now both installData.php and UpgradeData.php classes are working. It is highly recommended to move to new way of creating attributes.
Do check out our other articles related to Magento 2 development.
One comment
Comments are closed.