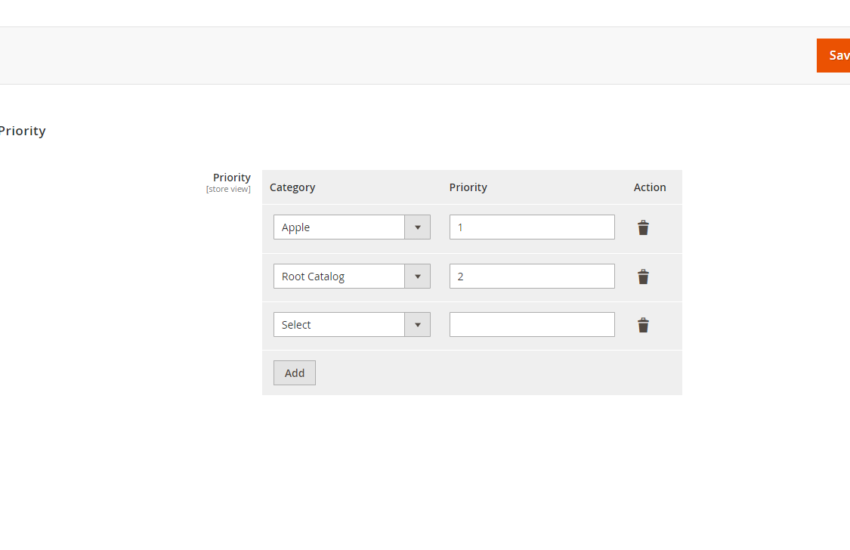
Dynamic row in Magento 2 allows developers to create custom configuration settings for their modules. These configuration settings can be accessed and modified in the Magento admin panel. Sometimes, it is useful to create a dynamic row in configuration to allow users to add multiple entries of a certain field. In this tutorial, we will learn how to create a dynamic row in Magento 2 configuration.
Table of Contents
Step 1: Create a System.xml file
First, we need to create a system.xml file in the etc/adminhtml directory of our custom module. This file defines the configuration settings for our module. We can define sections, groups, and fields in this file.
For this tutorial, we will create a new section called “Category Priority” and a new group called “Priority”. Inside the group, we will add a new field of type “button” or “label” that will trigger the creation of a new dynamic row.
Here is an example code snippet for the system.xml file:
<?xml version="1.0"?>
<config xmlns:xsi="http://www.w3.org/2001/XMLSchema-instance" xsi:noNamespaceSchemaLocation="urn:magento:module:Magento_Config:etc/system_file.xsd">
    <system>
        <tab id="learningmagento" translate="label" sortOrder="15">
            <label>learning Magento</label>
        </tab>
        <section id="dynamic_rows" translate="label" sortOrder="10" showInDefault="1" showInWebsite="1" showInStore="1">
            <label>Dynamic Row</label>
            <tab>learningmagento</tab>
            <resource>Learningmagento_Dynamicrow::dynaic_config</resource>
            <group id="category_priority" translate="label" type="text" sortOrder="10" showInDefault="1" showInWebsite="1" showInStore="1">
                <label>Category Priority</label>
                <field id="priority" translate="label" sortOrder="5" showInDefault="1" showInWebsite="1" showInStore="1">
                    <label>Priority</label>
                    <frontend_model>Learningmagento\Dynamicrow\Block\Adminhtml\Form\Field\Priority</frontend_model>
                    <backend_model>Magento\Config\Model\Config\Backend\Serialized\ArraySerialized</backend_model>
                </field>
            </group>
        </section>
    </system>
</config>
You can also follow below video to know about system.xml file.
Step 2: Create a Frontend Model Block Class
Next, we need to create a new block that will render the “Add Dynamic Row” . We will create a new block called Priority in the Learningmagento\Dynamicrow\Block\Adminhtml\Form\Field directory.
<?php

namespace Learningmagento\Dynamicrow\Block\Adminhtml\Form\Field;

use Magento\Config\Block\System\Config\Form\Field\FieldArray\AbstractFieldArray;
use Magento\Framework\DataObject;
use Learningmagento\Dynamicrow\Block\Adminhtml\Form\Field\Category;

class Priority extends AbstractFieldArray
{
    private $categoryRenderer;

    protected function _prepareToRender()
    {
        $this->addColumn('category', [
            'label' => __('Category'),
            'renderer' => $this->getCategoryRender()
        ]);
        $this->addColumn('priority', ['label' => __('Priority'), 'class' => 'required-entry']);
        $this->_addAfter = false;
        $this->_addButtonLabel = __('Add');
    }

    protected function _prepareArrayRow(DataObject $row)
    {
        $options = [];
        $category = $row->getCategory();
        if ($category !== null) {
            $options['option_' . $this->getCategoryRender()->calcOptionHash($category)] = 'selected="selected"';
        }
        $row->setData('option_extra_attrs', $options);
    }

    private function getCategoryRender()
    {
        if (!$this->categoryRenderer) {
            $this->categoryRenderer = $this->getLayout()->createBlock(
                Category::class,
                '',
                ['data' => ['is_render_to_js_template' => true]]
            );
        }
        return $this->categoryRenderer;
    }
}
Step 3. Creating Category class for dynamic row in Magento 2
Now that we’ve added a select dropdown to our dynamic row, it’s important to create a select class that can retrieve the necessary categories for our project.
<?php

namespace Learningmagento\Dynamicrow\Block\Adminhtml\Form\Field;

use Magento\Framework\View\Element\Html\Select;

class Category extends Select
{
    protected $categories;

    public function __construct(
        \Magento\Catalog\Model\ResourceModel\Category\CollectionFactory $collectionFactory,
        \Magento\Framework\View\Element\Context $context,
        array $data = []
    ) {
        $this->categories = $collectionFactory;
        parent::__construct($context, $data);
    }

    public function setInputName($value)
    {
        return $this->setName($value);
    }

    public function setInputId($value)
    {
        return $this->setId($value);
    }

    public function _toHtml()
    {
        if (!$this->getOptions()) {
            $this->setOptions($this->getSourceOptions());
        }
        return parent::_toHtml();
    }

    private function getSourceOptions()
    {
        $options[] = ['label' => 'Select', 'value' => 0];
        $categories = $this->categories->create()->addAttributeToSelect("*");
        foreach ($categories as $category) {
            $options[] = ['label' => $category->getName(), 'value' => $category->getId()];
        }
        return $options;
    }
}
To access the dynamic row in configuration, navigate to the “Learning Magento” menu and select “Dynamic Row” to view the newly added functionality. You can refer official documentation of adobe commerce. Now to access this configuration values you can follow article Get Configuration Values in Magento 2.


One comment
Comments are closed.